PostFinance Checkout Shopware 6 Documentation
Documentation
1Overview
The PostFinance Checkout Plugin integrates modern payment processing into Shopware 6, offering features like iFrame-based payments, refunds, captures, and PCI compliance. It supports seamless integration with the PostFinance Checkout Portal for managing transactions and payment methods.
Important: Please note that only Major (e.g. 6.x.0.0) and Minor (e.g. 6.0.x.0) update will be tested for compatibility within a 2 weeks after release.
2Requirements
Shopware Version: 6.5.x, 6.6.x or 6.7.x (see compatibility table).
PHP: Minimum version as required by your Shopware installation (e.g., 7.4+).
PostFinance Checkout Account: Obtain Space ID, User ID, and API Key from PostFinance Checkout Portal (see Portal Start-up Guide).
For using recurring payments, you also need Showpare Commercial package, which is a paid product.
3Compatibility
Shopware Version |
Plugin Version |
PHP Version |
Support Until |
6.7.x |
7.x.x |
PHP 8.2 and 8.3 |
Ongoing |
6.6.x |
6.x.x |
PHP 8.2 and 8.3 |
December 2025 |
6.5.x - Deprecated |
5.x.x |
PHP 8.2 and 8.3 |
October 2024 |
4Installation
4.1Via Marketplace
-
Log in to the backend of your Shopware store.
-
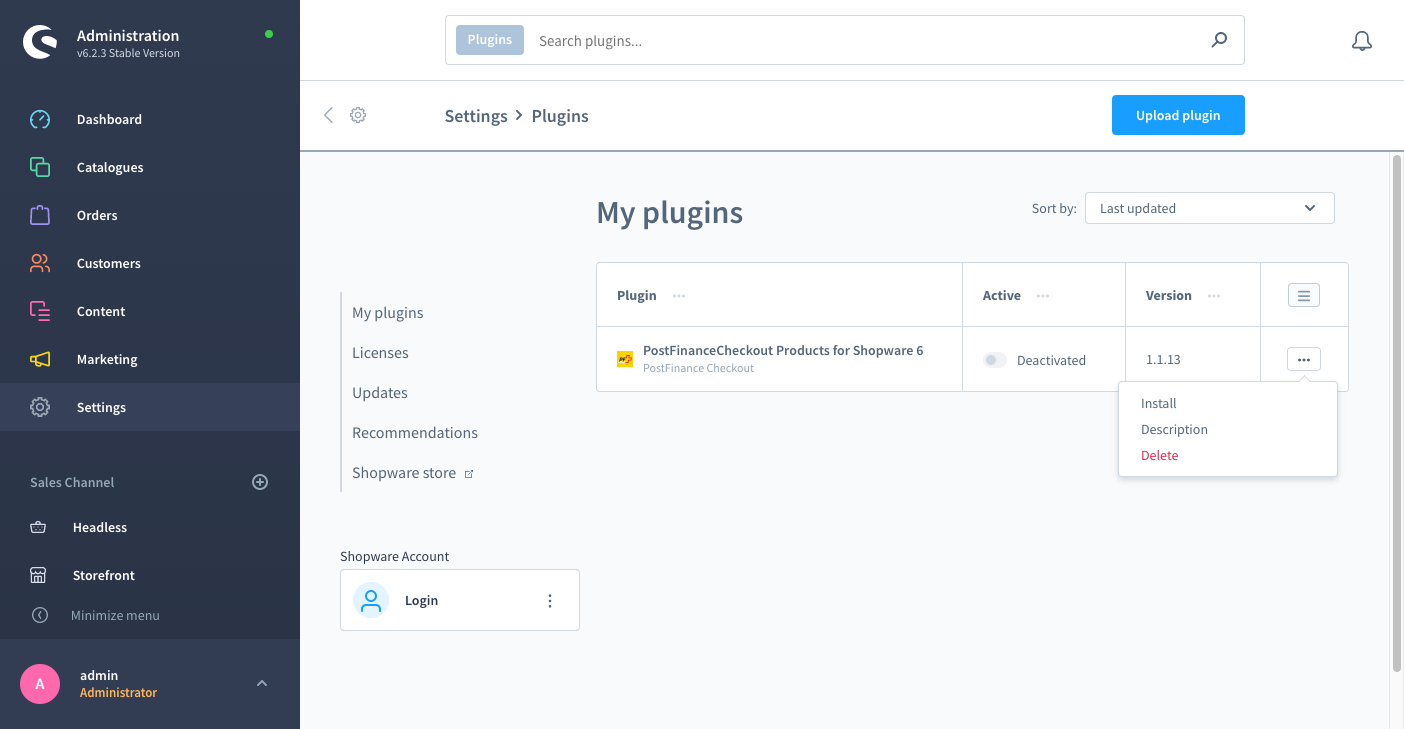
Navigate to Settings → System → Plugins.
-
Click on the menu caret and select the Install link of the plugin to install
-
Activate the PostFinance Checkout plugin from the Plugin Manager.
4.2Via Composer (Recommended)
-
Navigate to your Shopware root directory.
-
Run:
composer require postfinancecheckout/shopware-6
php bin/console plugin:refresh
php bin/console plugin:install --activate --clearCache PostFinanceCheckout
4.3Manual Installation
-
Download the latest release.
-
Extract the ZIP into
custom/plugins/ -
Run
php bin/console plugin:refresh
php bin/console plugin:install --activate --clearCache PostFinanceCheckout
4.4PostFinanceCheckout does not appear in Settings
You should run the following commmand
bin/build-administration.sh5Update
5.1Via Administration
-
Go to Shopware Admin > Extensions > My extensions.
-
Find PostFinanceCheckoutPayment.
-
Click Update.
5.2Via CLI
-
Deploy the new plugin files (replace the folder in
custom/plugins/PostFinanceCheckoutPaymentor upload/install a new ZIP). -
Run:
bin/console plugin:refresh
bin/console plugin:update --clearCache PostFinanceCheckoutPayment
bin/console cache:clear
6Portal Startup Guide
Go to PostFinance Checkout and create an Account if you do not already have one.
|
Tip
|
Please select the proper subscription plan - it should support ecommerce transaction. |
6.1Create the API key:
-
Once your account is activated; please navigate to Account → Application Users

-
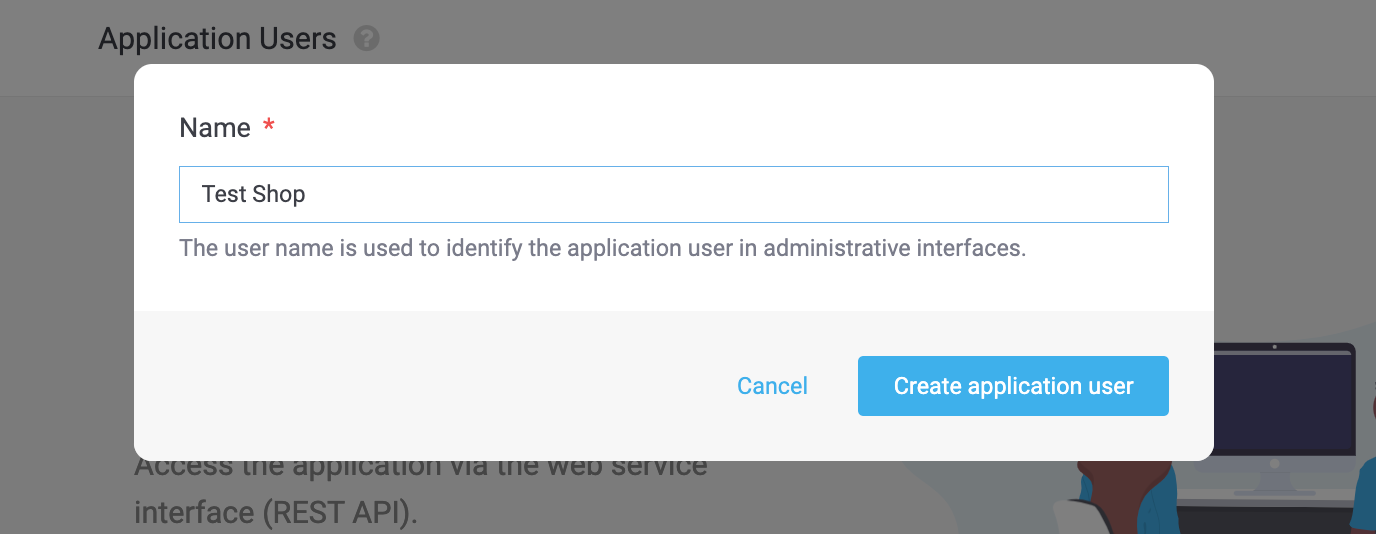
Click on Create application user

-
Specify a name for this API Key - I will put Test Shop and click on Create application user
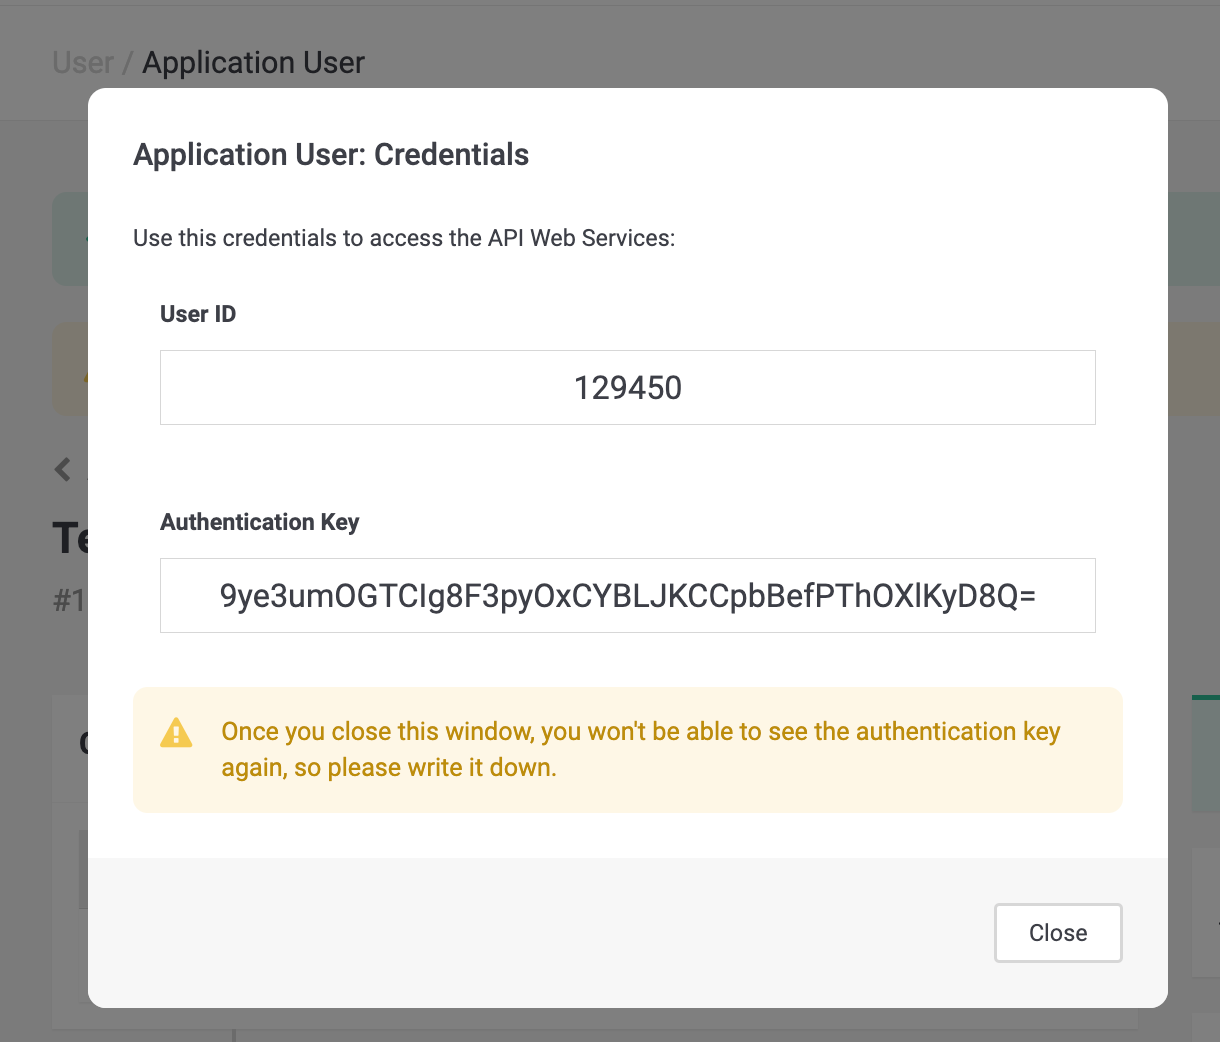
-
Your Application User will then be created. Please copy the User ID and Authentication Key as you will need them to link your shop to the portal.
-
Finally; you will need to allow certain permission to this Application User so it can communicate with your space. To do so; under Role; navigate to Manage.
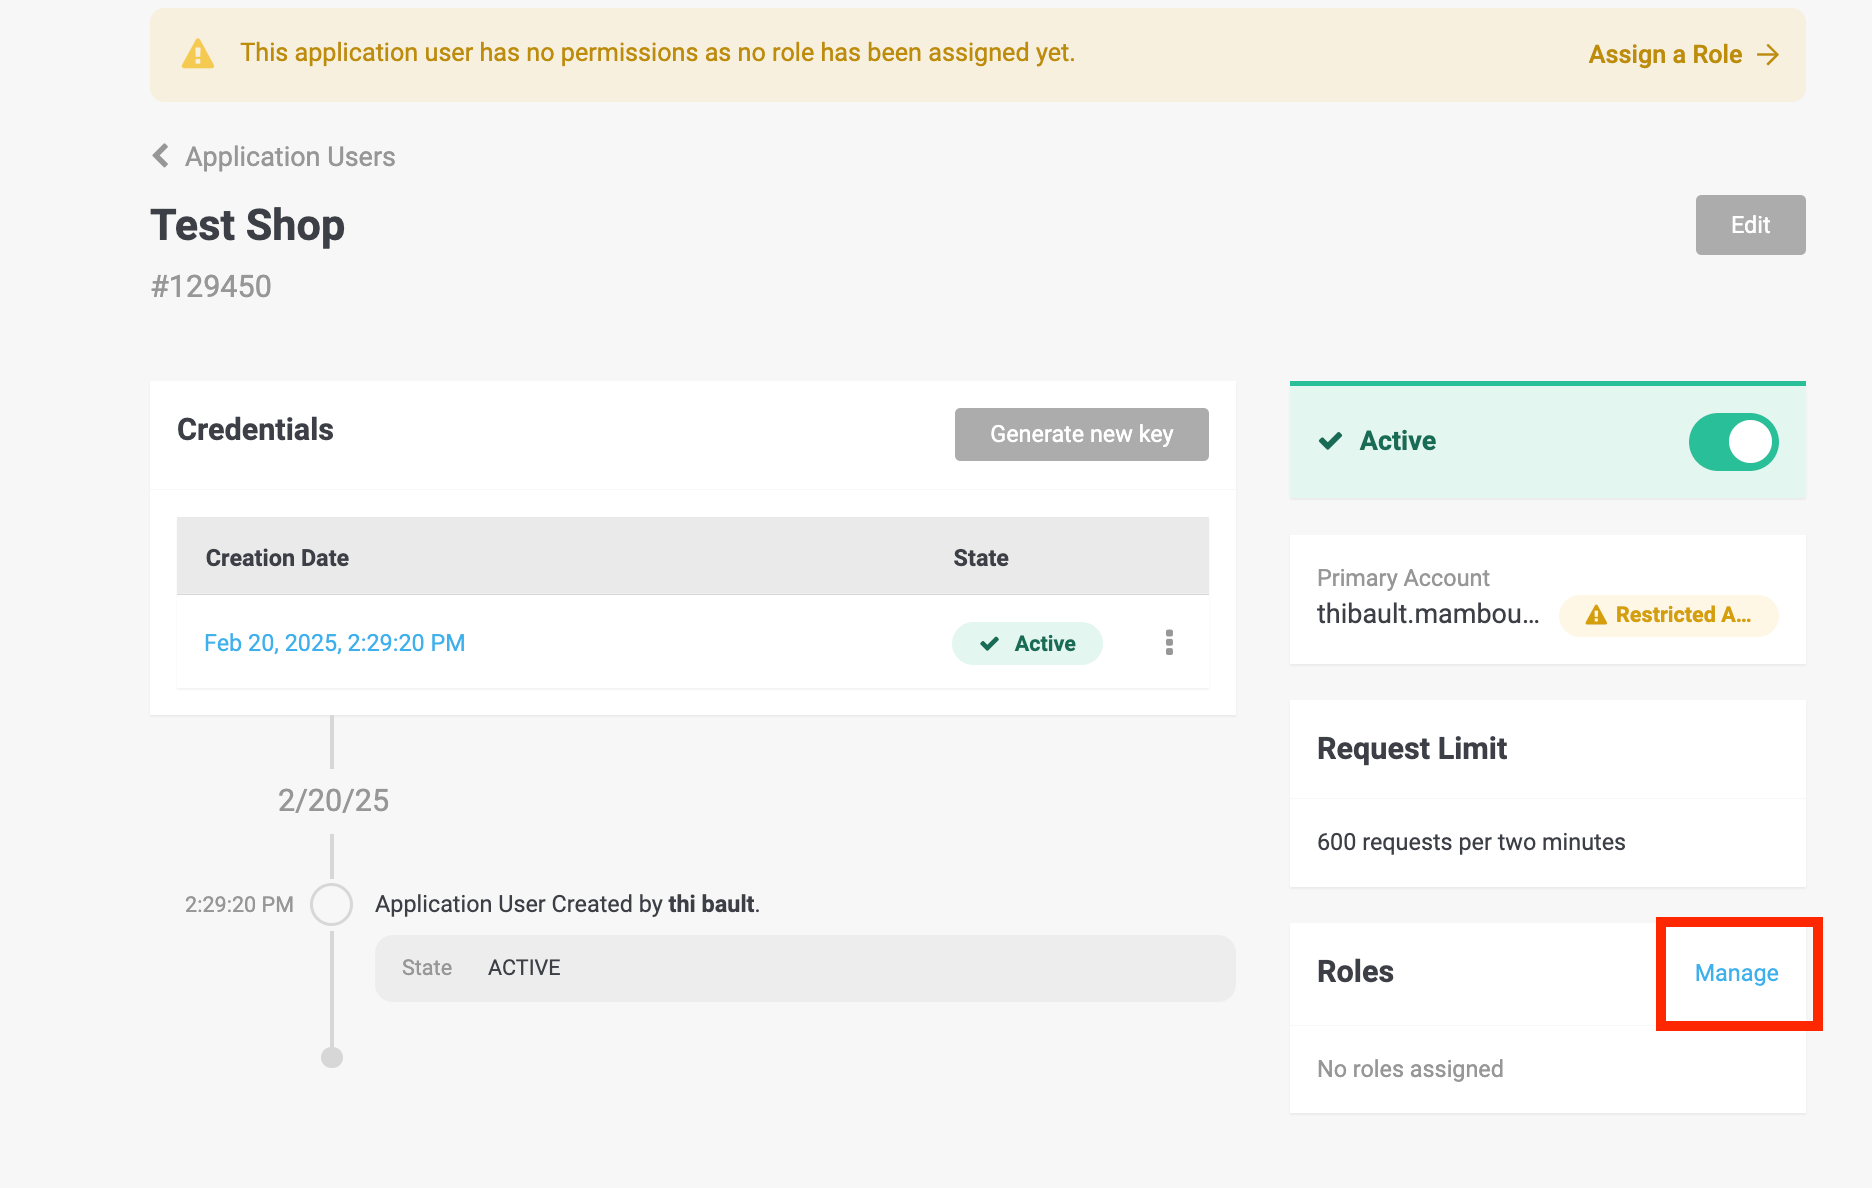
-
Click on the + sign next to Space Roles
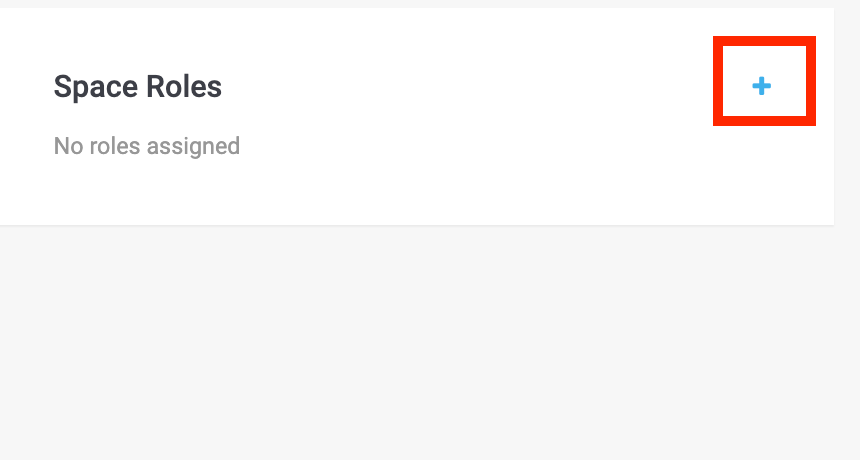
-
Please add the role Space Admin and click on Assign Role.
TipPlease note that Roles might be loading for few seconds 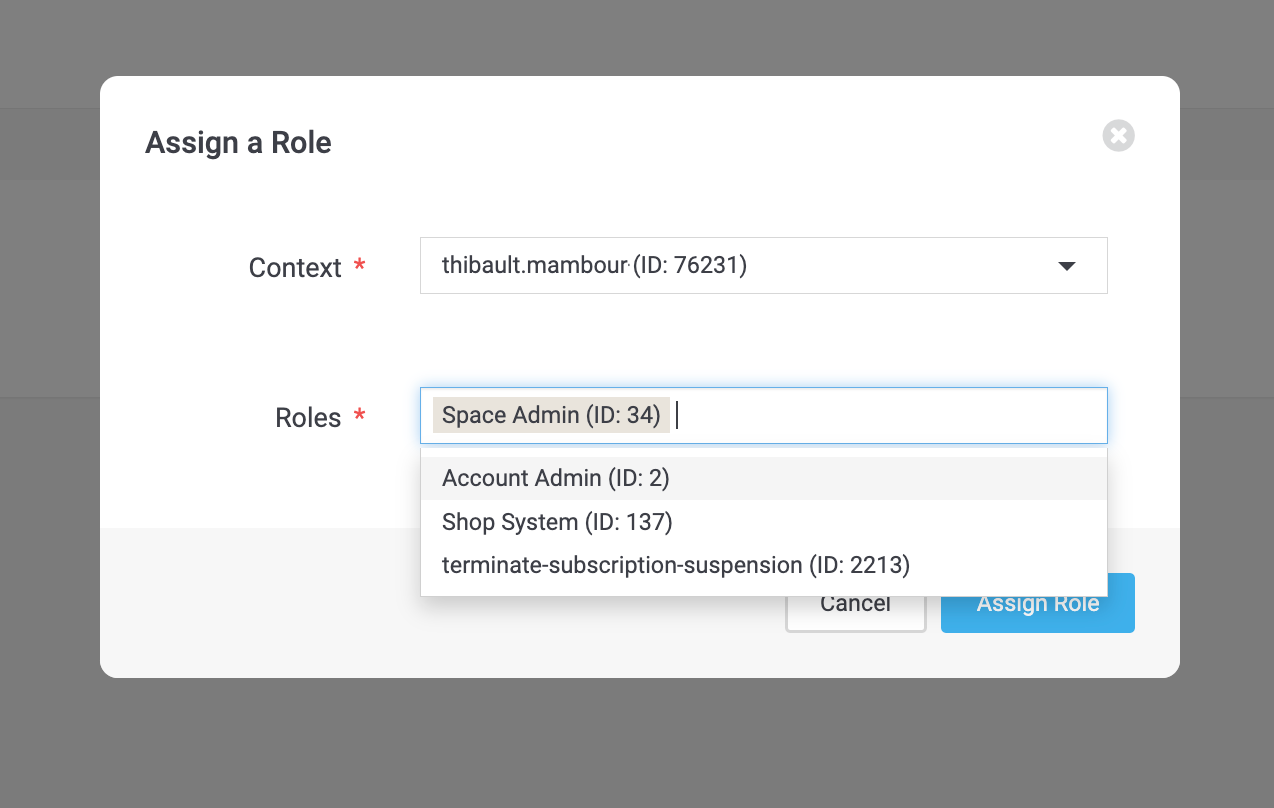
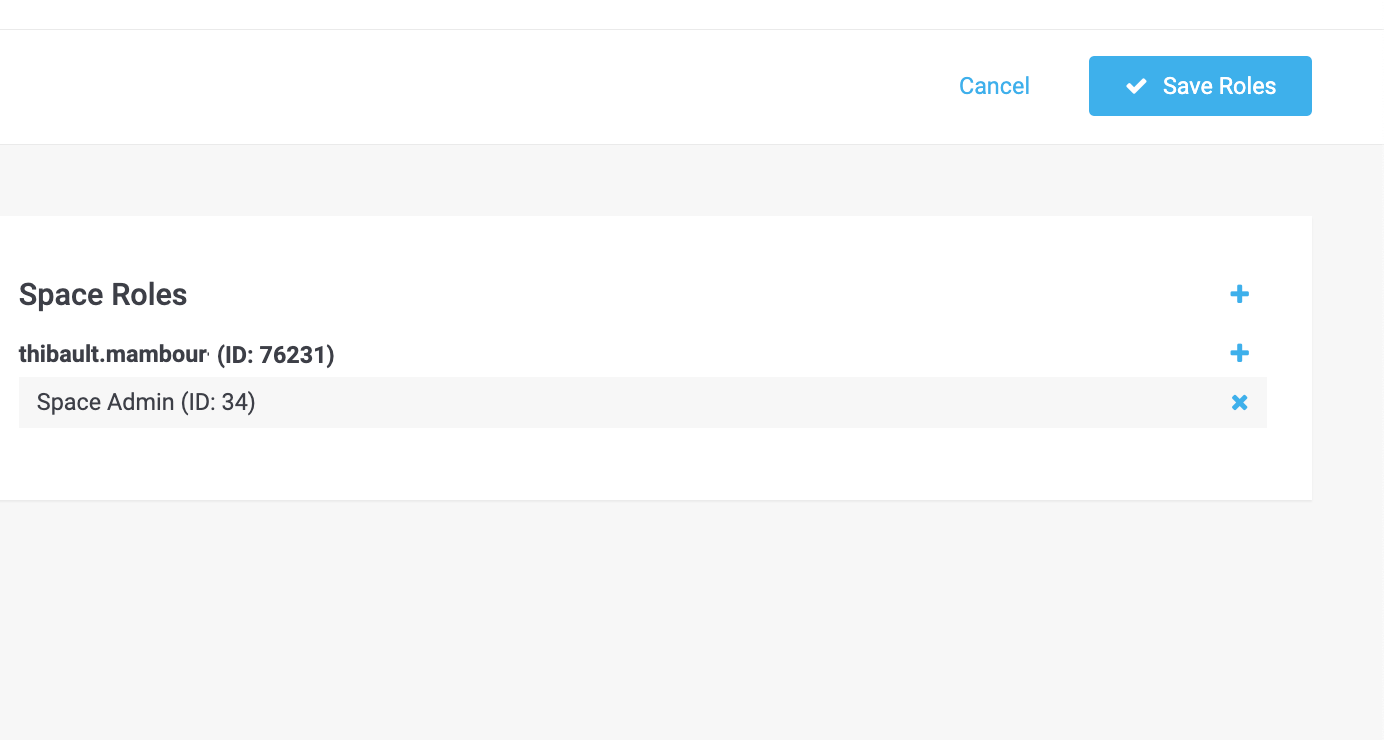
-
Finally click on Save Roles; you will need to enter your password to confirm.
6.2Setup Payment Methods
You can now setup the payment methods you would like to have; for testing purpose we will use the Bogus Processor. Please note that if you would like to run production transaction; you can use either our Payfac offering or connect directly to a specific PSP (Worldline; ACI; …)
-
Navigate to Space → Settings and click on Processors
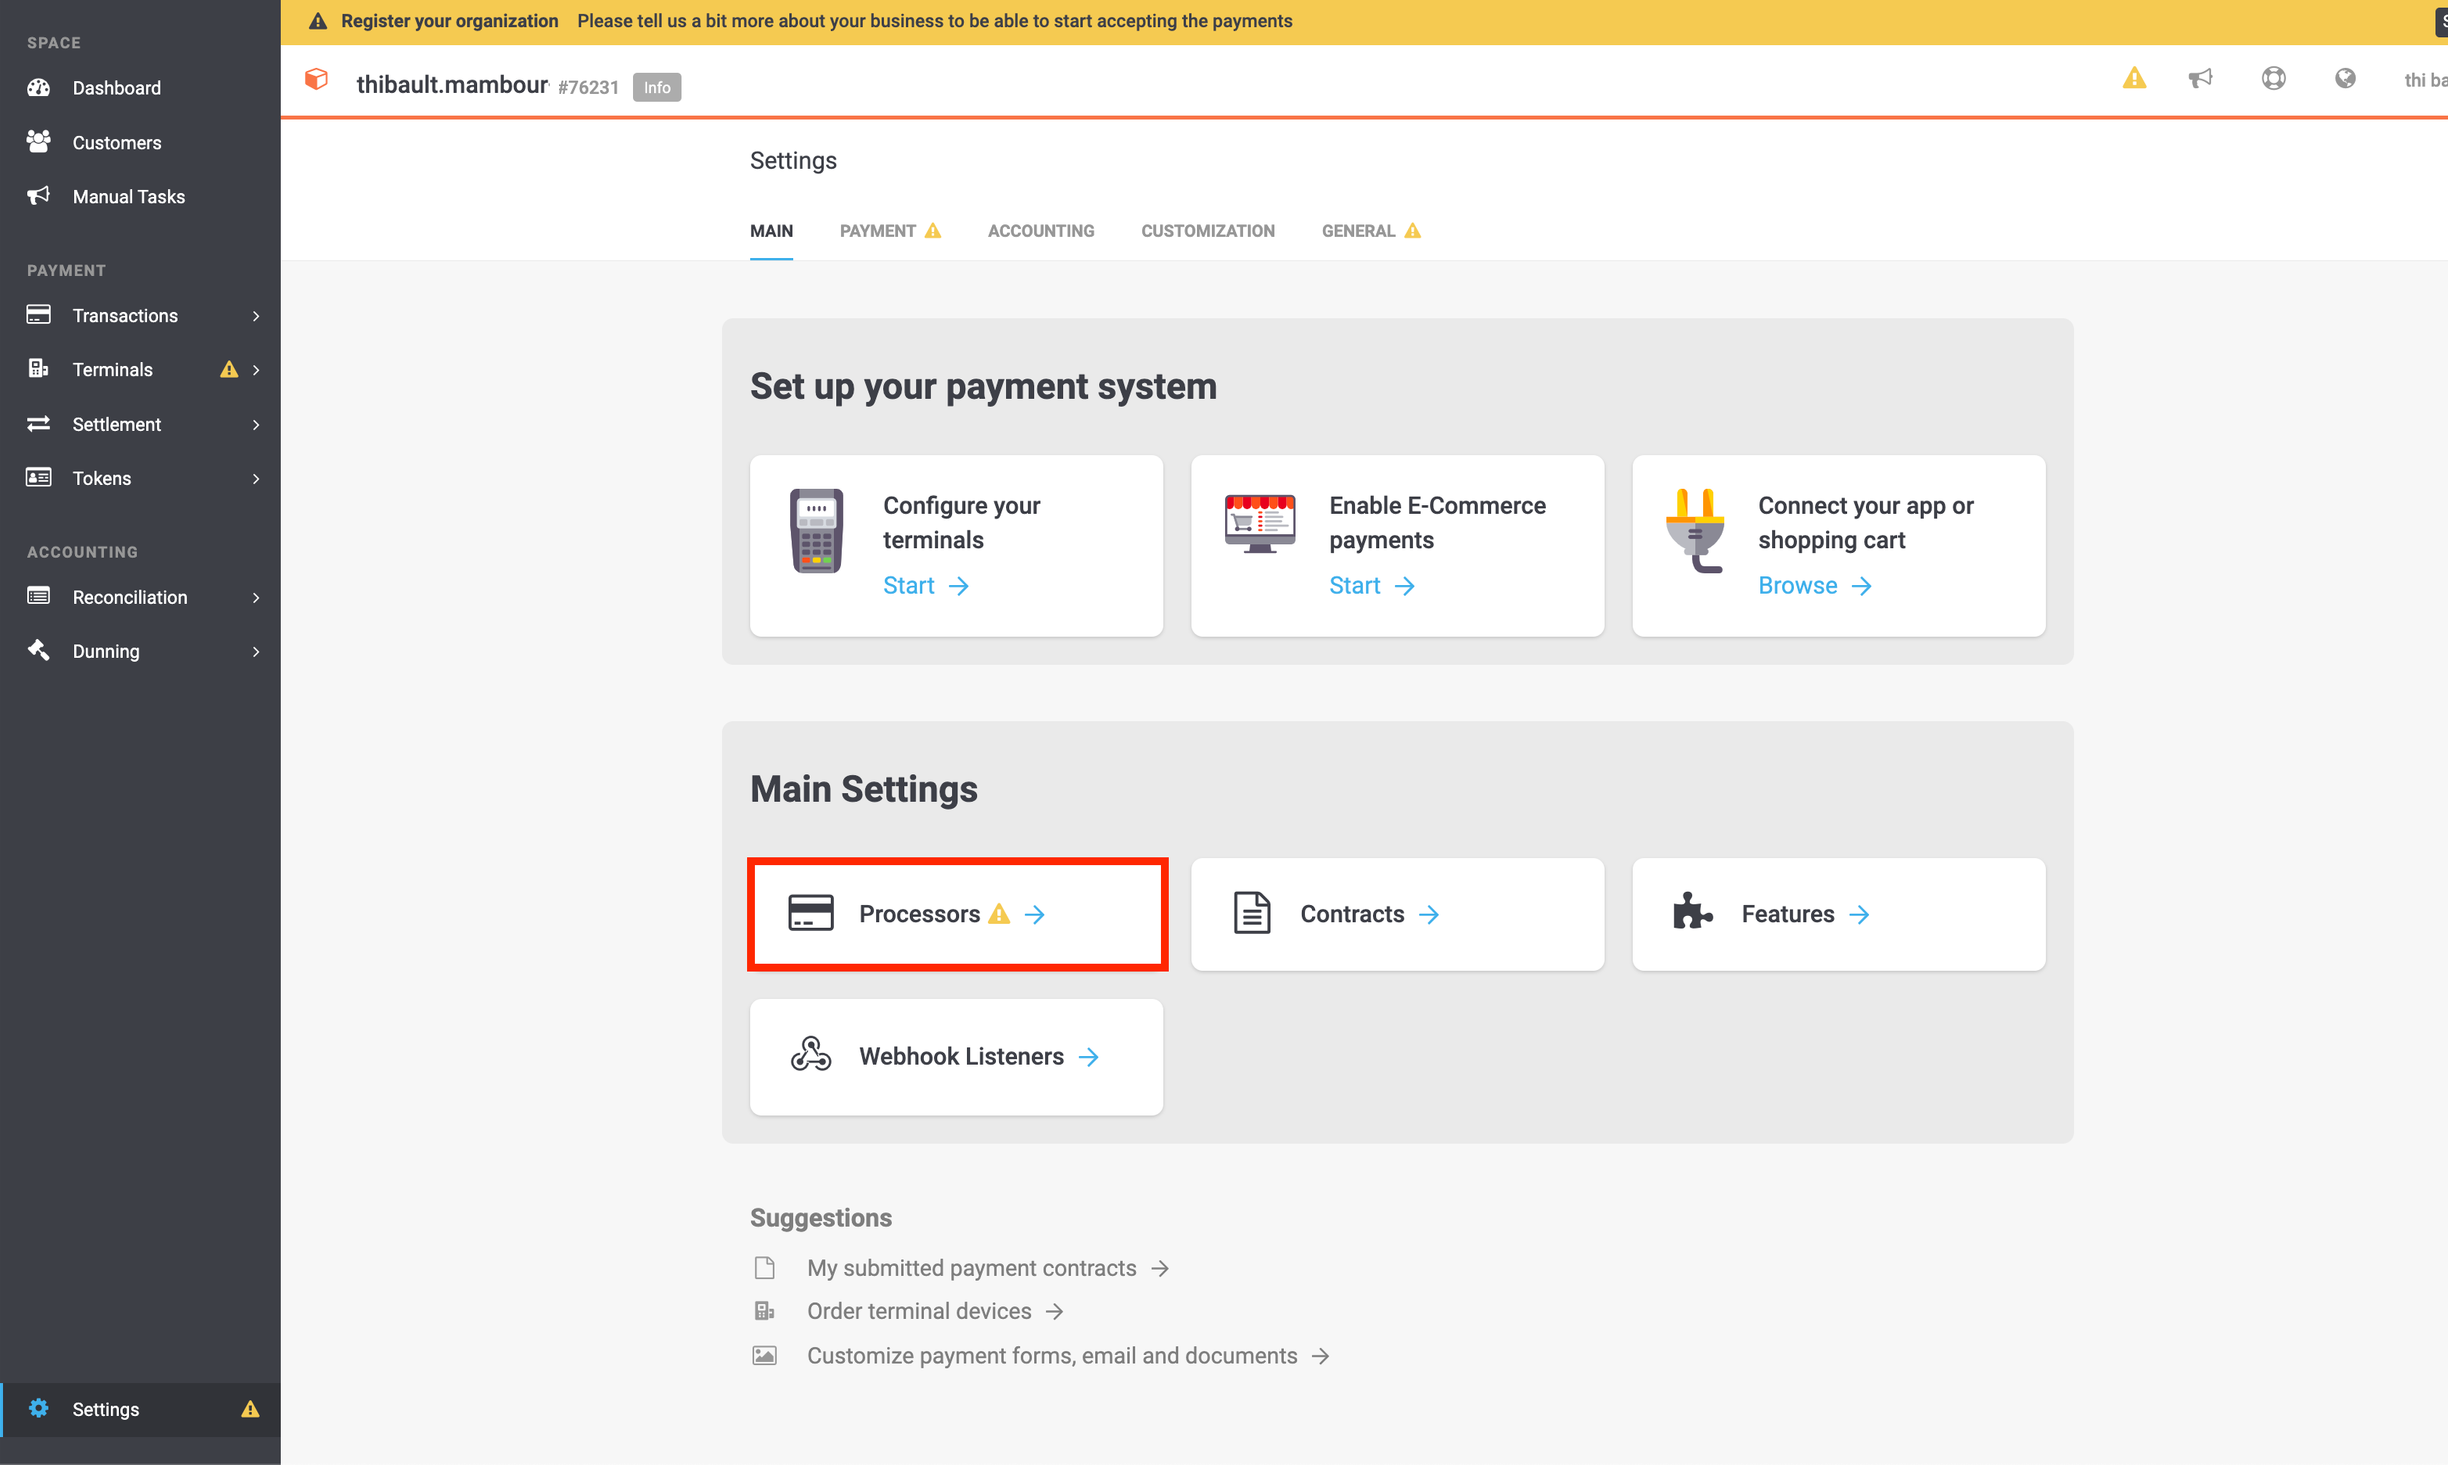
-
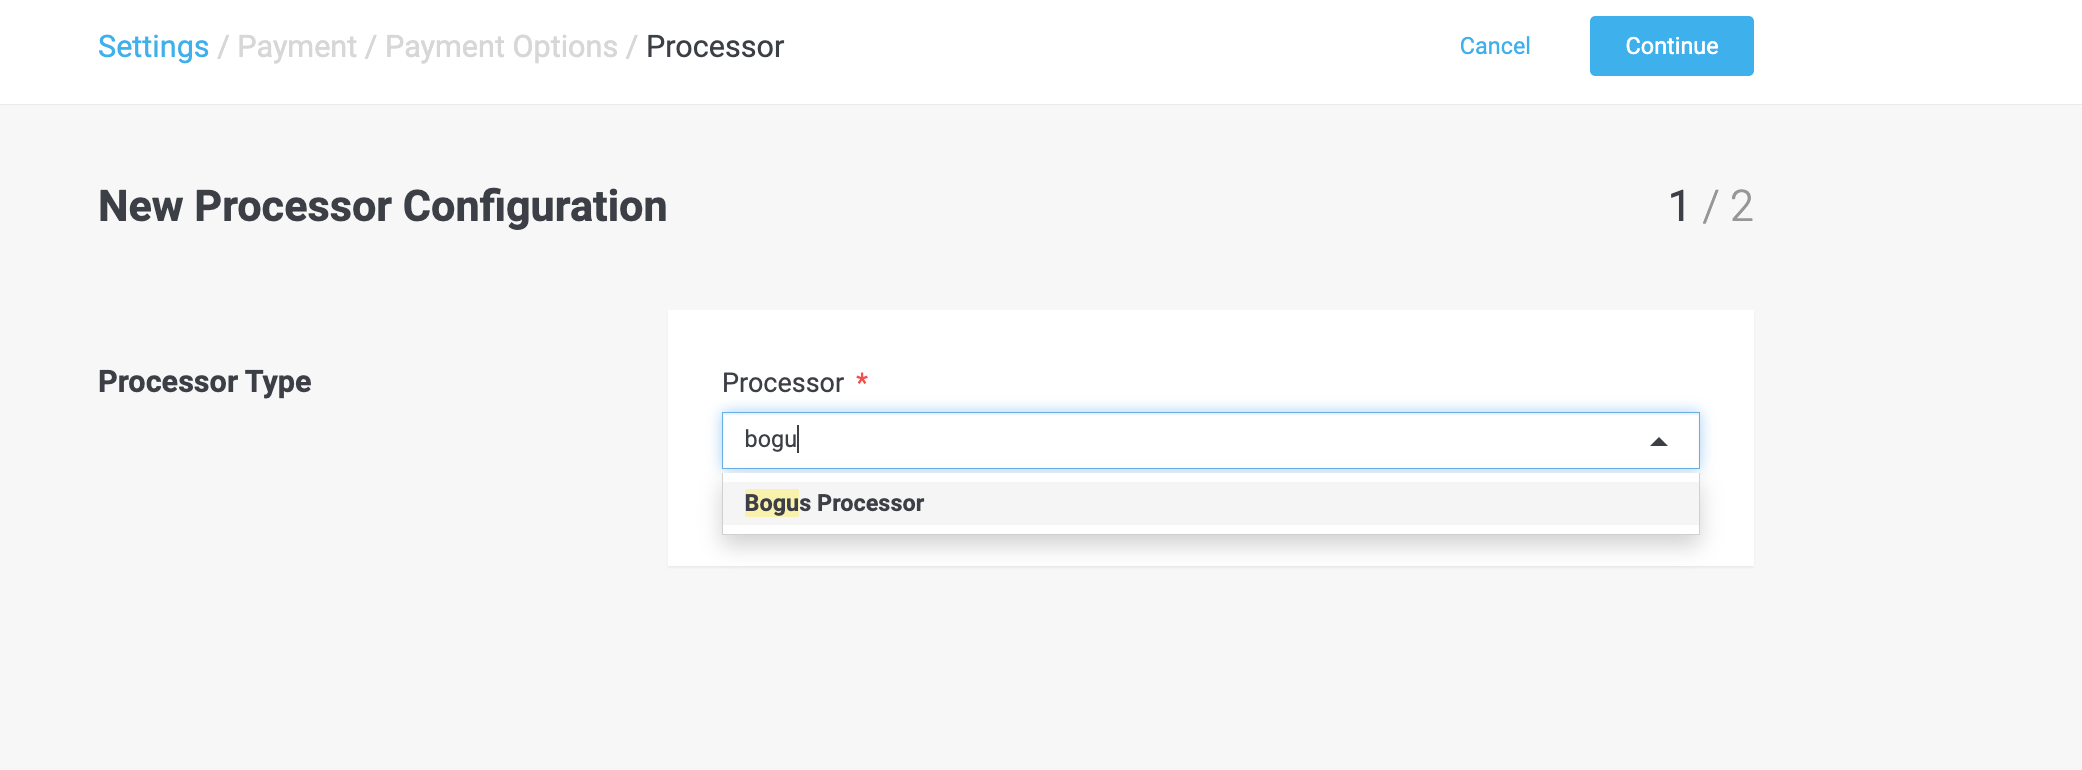
Click on Configure processor
-
Select Bogus Processor and click on Continue
-
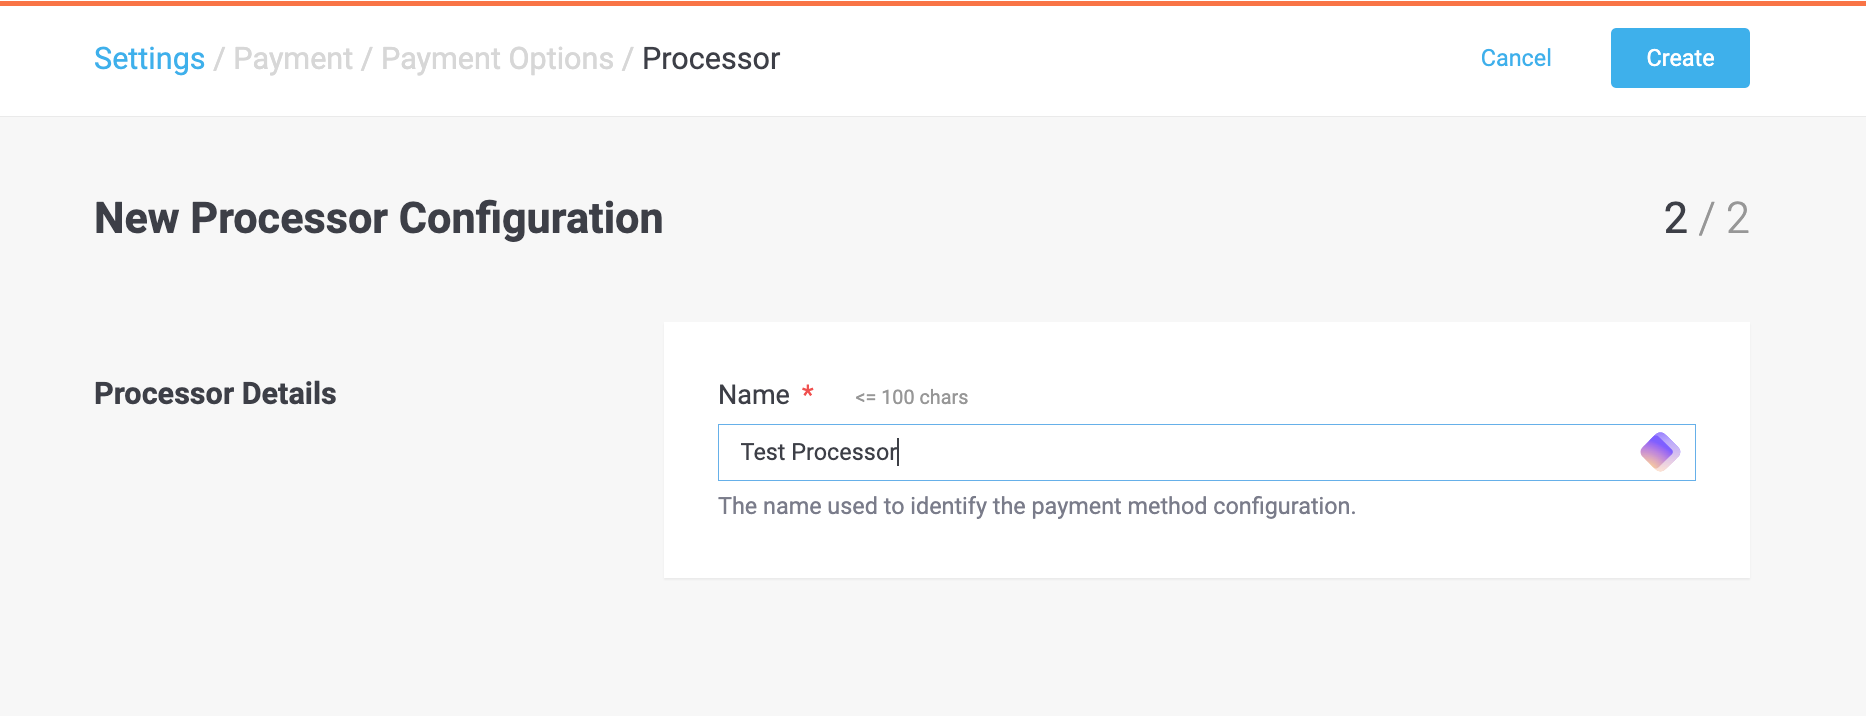
Set up the name you would like to give to your processor - e.g. Test Processor - and click on Create
-
Select all the Connectors that apply and click on Save
TipPlease note that the connectors seems duplicated but it because one is for Physical Terminal payment and one for Ecommerce Payment 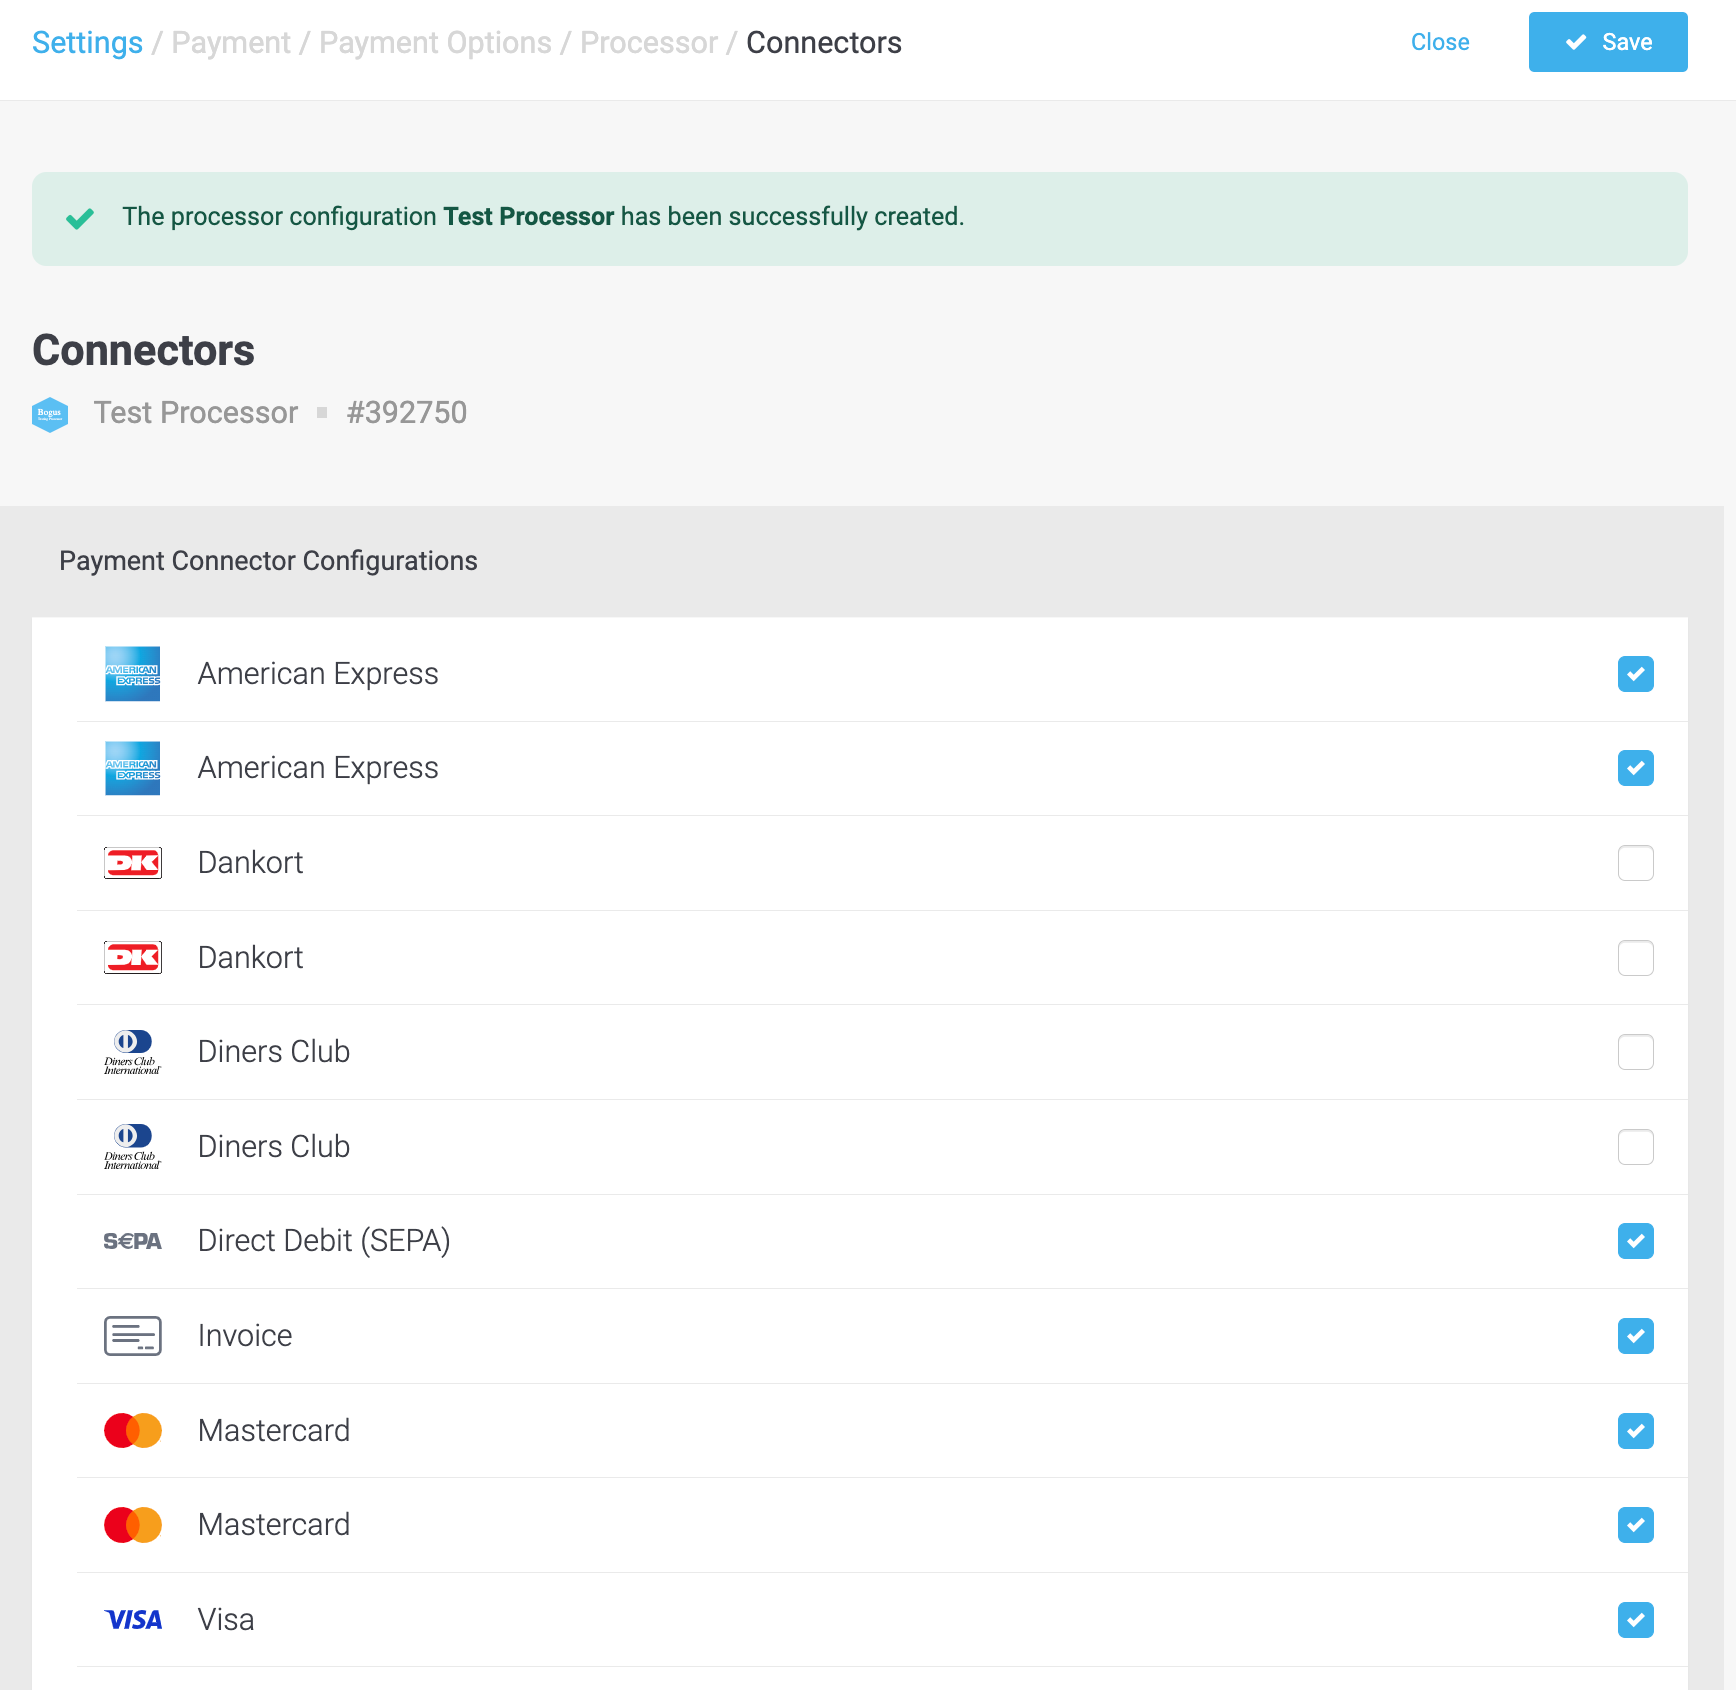
Payments methods are now available in the portal
7Shop Startup Guide
-
API Credentials
-
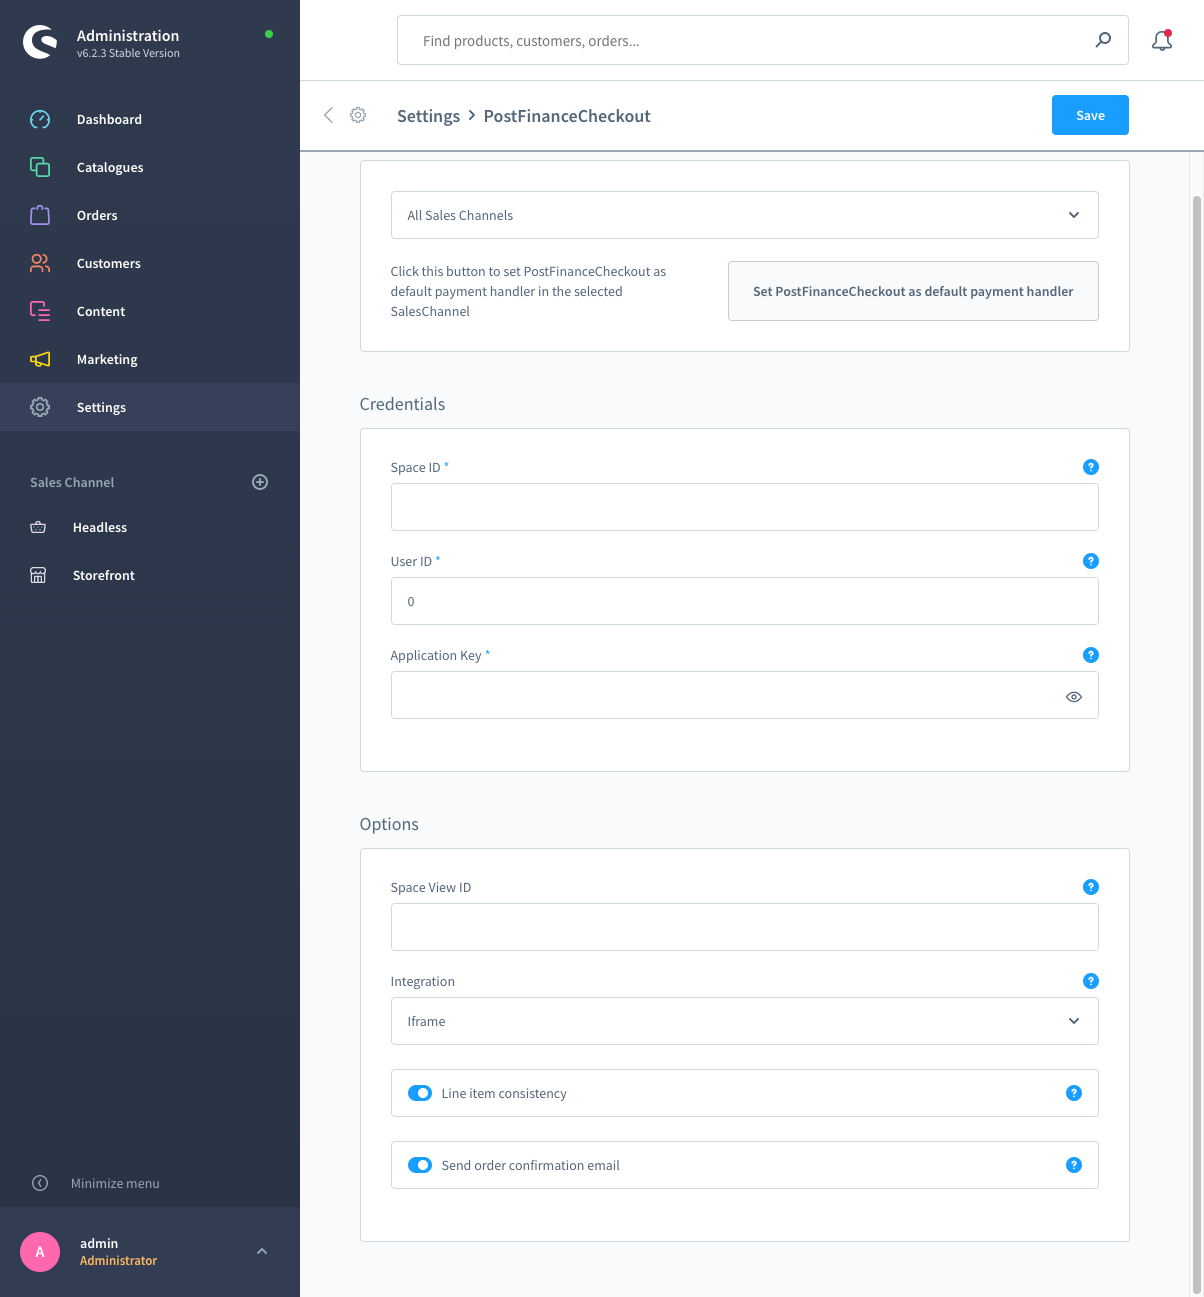
Navigate to Shopware Admin → Settings → Extensions → PostFinance Checkout and click on Save.
-
Enter your
Space ID,User ID, andAPI Key-
For the Space id; you can navigate to Space and it will be provided - e.g. Space id = 76231
-
-
-
Payment Methods
The payment methods available at checkout are driven by the PostFinance Checkout Portal. If you would like to disable a payment method; you will need to disable such payment method from the portal.
NotePlease note that as there is a synchronisation between the portal and shop; you can do the same from the shop under Settings → Payment Methods -
Go to your Space → Settings → Payments → Payment Methods

-
Select the payment method you would like to disable. Click on the slider to disable it → it should become inactive.
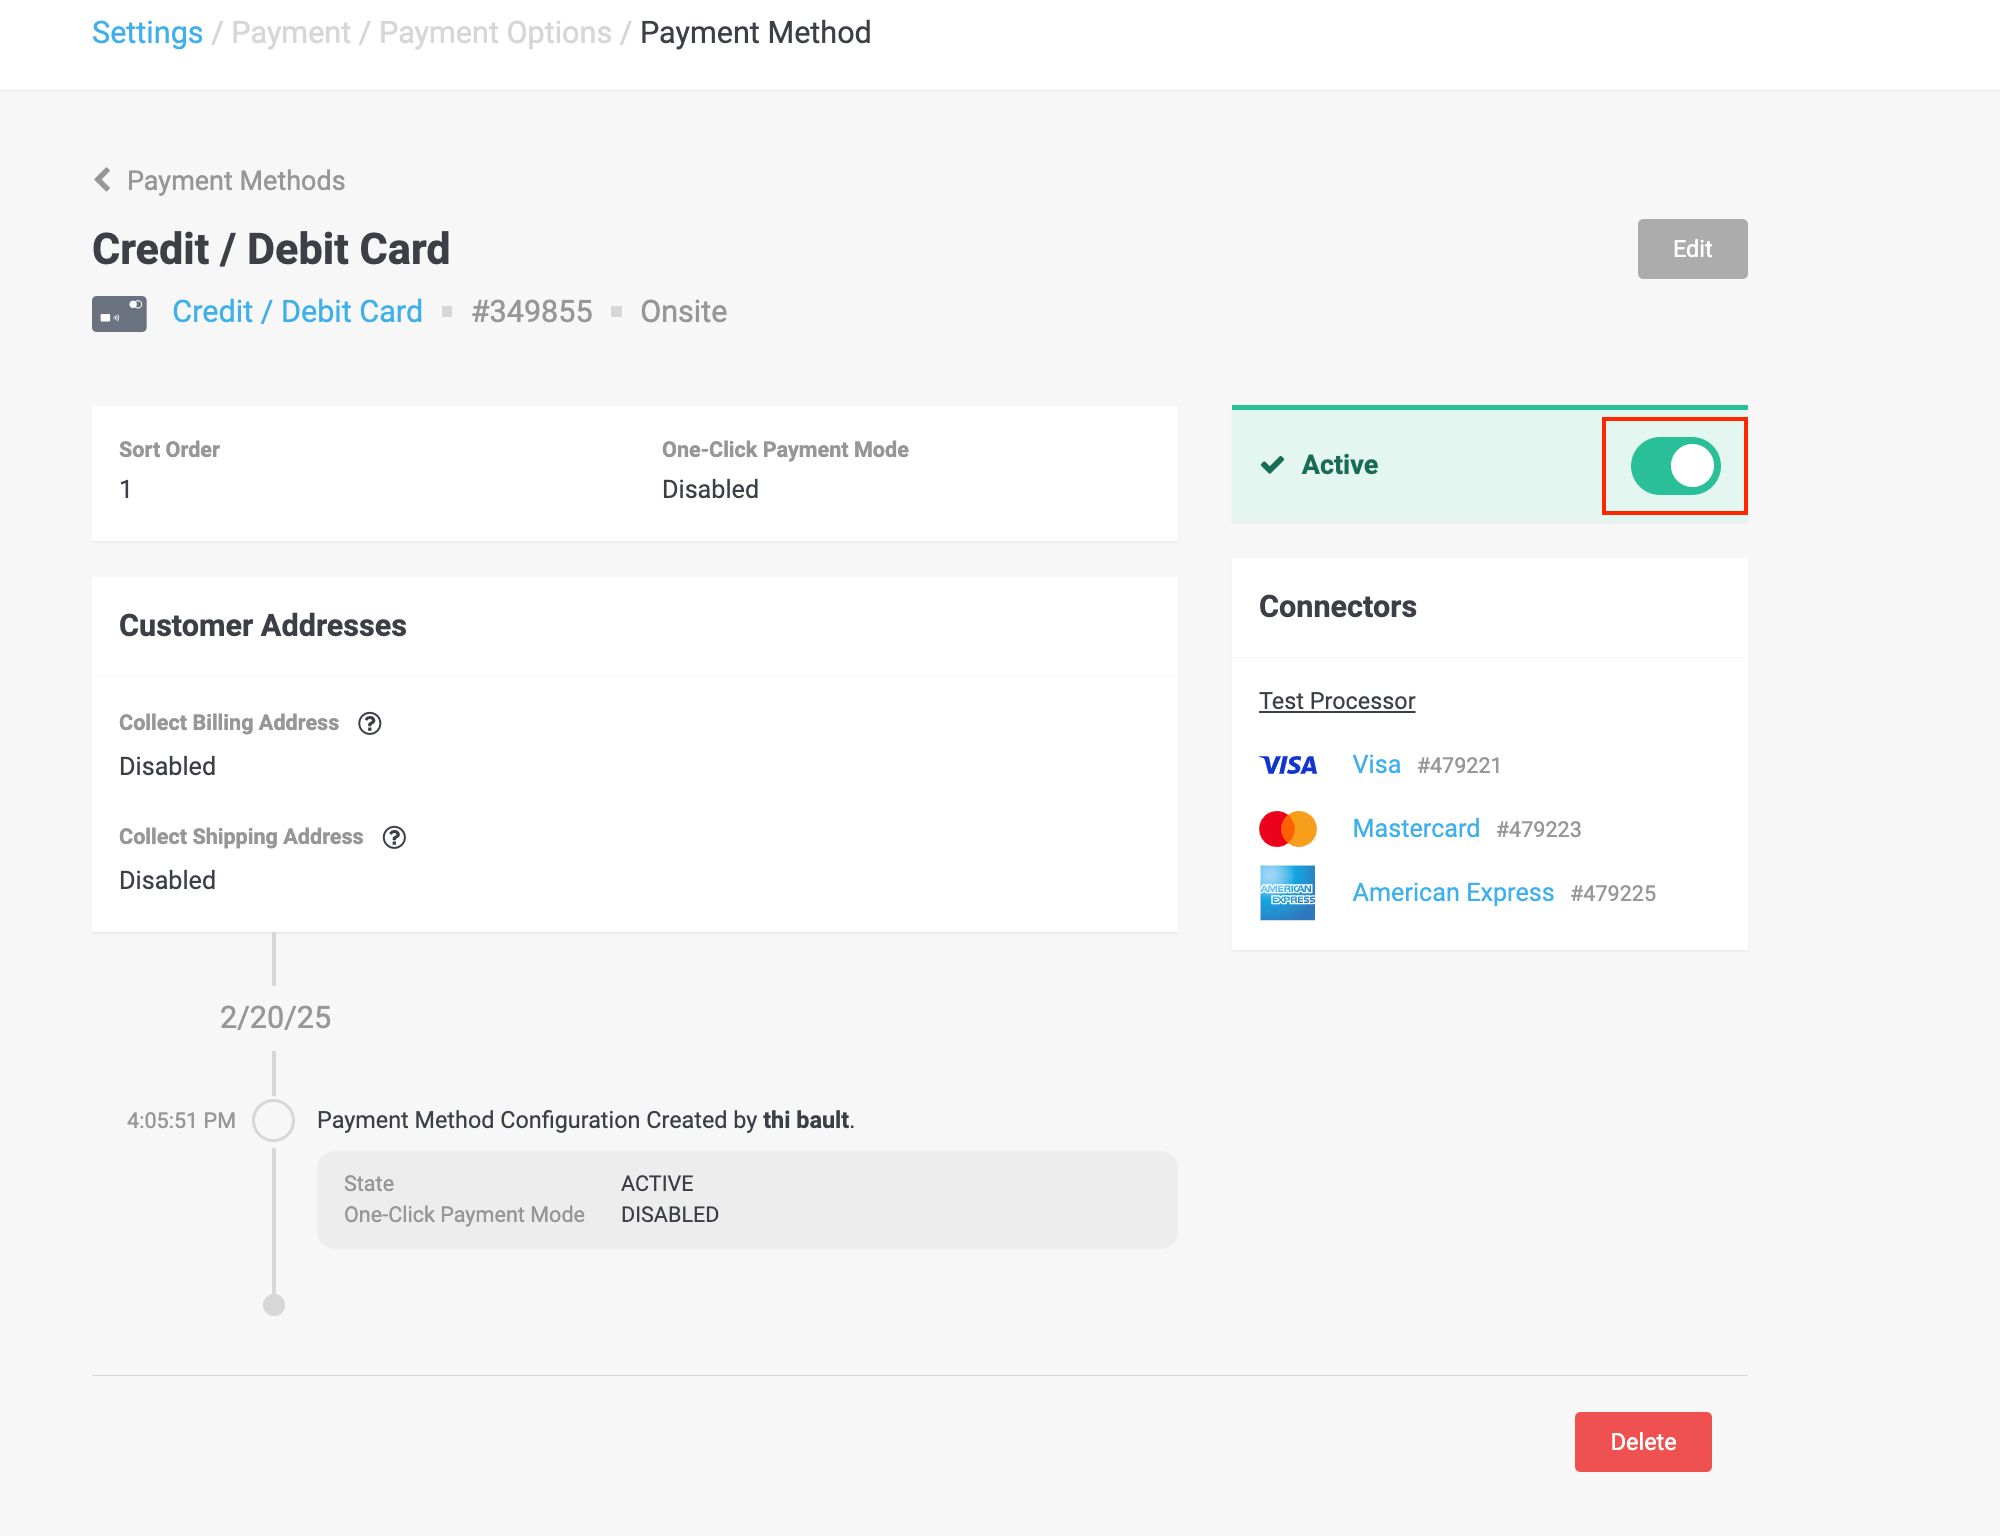
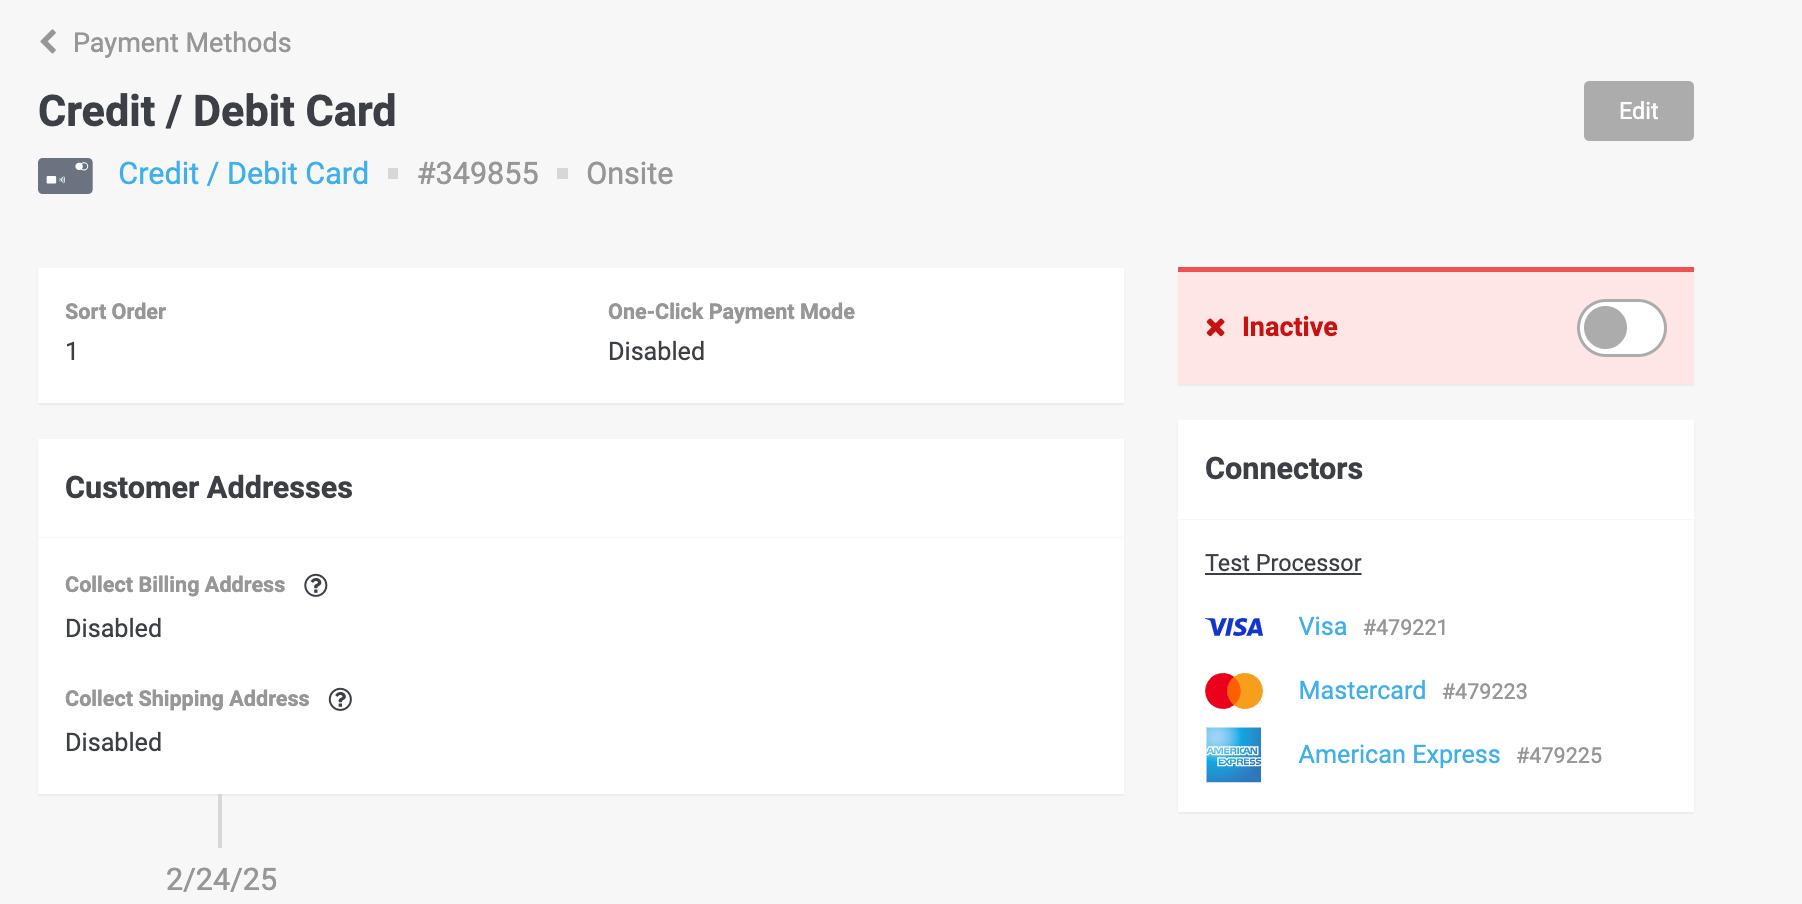 Tip
TipIf you would like to disable only a Connector from a Payment Method (e.g. Mastercard for a Credit Card); please go to the Connector section.
-
-
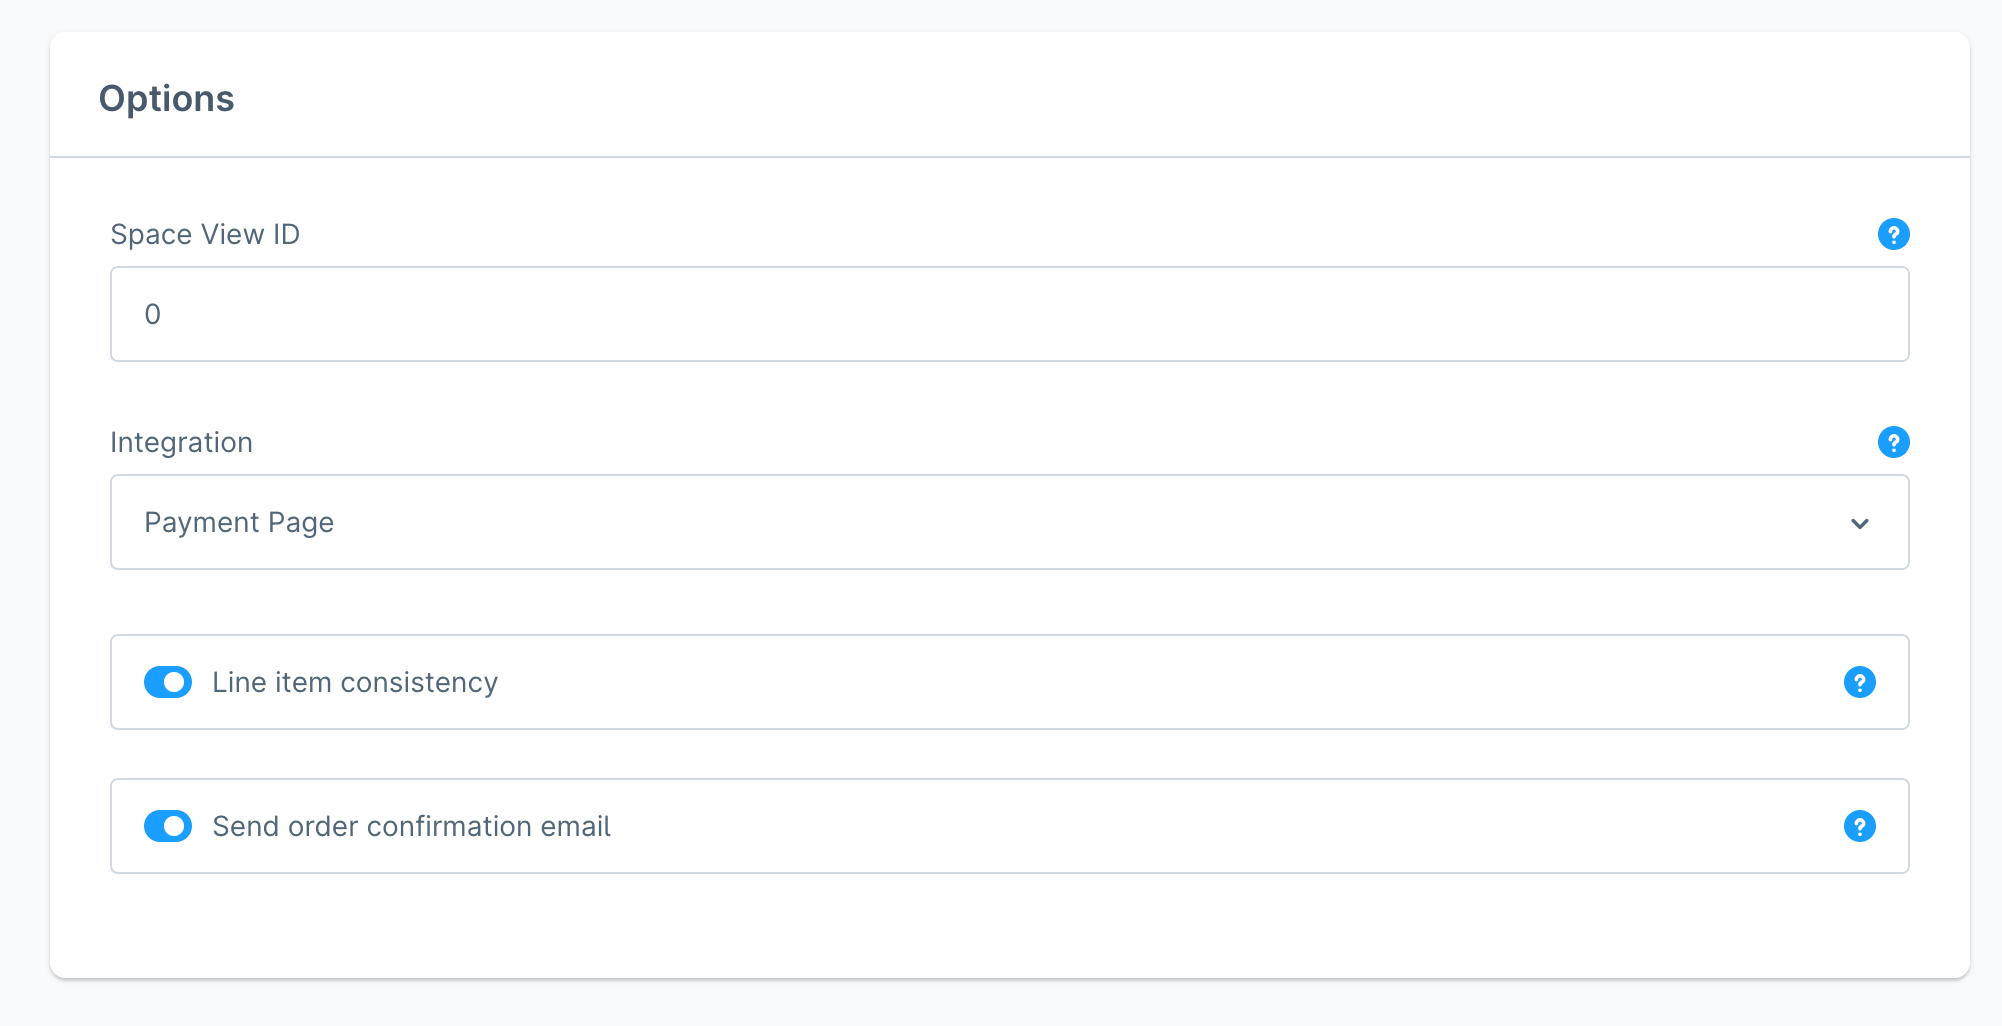
Options
-
Space View Id: This field allows you to apply custom styling to the payment form and payment page. The styling is defined in your Space settings in the Portal.
NotePlease note that if you do not use the Space View Id; this option should stay empty -
Integration: The Integration Options setting determines how the payment form is displayed during the checkout process. The following options are available:
-
IFrame: Embeds the payment form directly within the WooCommerce checkout page for a seamless experience.
-
Lightbox: Opens a secure popup window for customers to complete their payment without leaving the checkout page.
-
Payment Page: Redirects customers to a dedicated payment page hosted by the payment provider.
-
-
Line Item Consistency: Shopware calculates taxes at the line-item level, which may result in minor discrepancies (typically a few cents) between the order’s total tax and the displayed price. This discrepancy occurs due to rounding differences during individual line-item calculations. If the "Enforce consistency" setting is enabled, the portal will automatically reject orders with such discrepancies. To avoid payment processing issues, we recommend disabling this setting unless strict tax total validation is required.
-
Send Order Confirmation Email: Enable this option to send order confirmation emails directly from Shopware instead of the Portal.
-
8Transaction State graph
The Payment Process of PostFinance Checkout is completely standardized for every payment method you can process. This gives you the ability to simply add a payment method or processor without changes inside of your Shopware configuration. An overview about the states and the payment processes of PostFinance Checkout can be found in the Payment Documentation.
In the following section we provide you an overview about how the PostFinance Checkout states are mapped into the Shopware State graph for orders and payment states.
8.1State mapping of Shopware orders
When the order gets abandoned also Order status goes to "cancel" after approx. 40 minutes. We also change the Payment status, and the Delivery status.
8.1.1General remarks regarding order statuses
We recommend that you only change the Order status once the Payment status has reached a final state.
8.2State mapping of Shopware payment status
Below you can find a diagram that shows the state machine of Shopware for payment status including additional information for the state transitions.

-
If the transaction is
Authorizedin PostFinance Checkout, the Shopware order payment status is marked asIn Progress. -
If the transaction fails before or during the authorization process, the Shopware order payment status is marked as
Failed. -
If the transaction fails after the authorization, the Shopware order payment status is marked as
Cancelled. -
If the transaction invoice in PostFinance Checkout is marked as
PaidorNot Applicable, the Shopware order payment status is marked asPaid.
8.2.1General remarks regarding payment statuses
We recommend that you do not change the payment status manually. If you do so, it may be changed again by the plugin.
8.3State mapping of Shopware delivery status
Below you find a diagram that shows the state machine of Shopware delivery status including additional information for the state transitions.

-
If the transaction is
Confirmedstatus in PostFinance Checkout, the Shopware order delivery status is marked asHold. -
If the transaction in PostFinance Checkout is marked as
Fulfill, the Shopware order delivery status is marked asOpen. -
If the transaction is in
Decline,FailedorVoided, the Shopware order delivery status is marked asCancelled.
9Transaction management
You can capture, cancel and refund transactions directly from within the Shopware backend. Please note if you refund, void or capture transactions inside PostFinance Checkout the events will be synchronized into Shopware. However, there are some limitations (see below).
9.1Complete (capture) an order
You have the possibility for your transactions to have the payment only authorized after the order is placed. Inside the connector configuration you have the option, if the payment method supports it, to define whether the payment should be completed immediately or deferred.
In order to capture a transaction, open the order and click on the Complete button.
|
Note
|
When the completion is pending in PostFinance Checkout the order will stay in pending state. |

Deferred payment completion
Retailers often have the case that they want to authorize transactions only and start the fulfillment process once all items are shippable. This is also possible with PostFinance Checkout.
However, certain processes should be followed. If you have configured payment completion to be deferred you should capture the transaction before you initiate the shipment
as it can always happen that a completion fails. If you want to be sure that you do not ship items for which you have not been paid you should postpone the shipment until
the fulfill state is reached. Initially the transaction will be in the Authorized state in PostFinance Checkout and In Progress in Shopware. If you want to start the fulfillment process make sure you initiate the completion process as described above. Once the completion was successful the order will switch into the Fulfill state in PostFinance Checkout and into Paid state in Shopware. You can now start the fulfillment process.
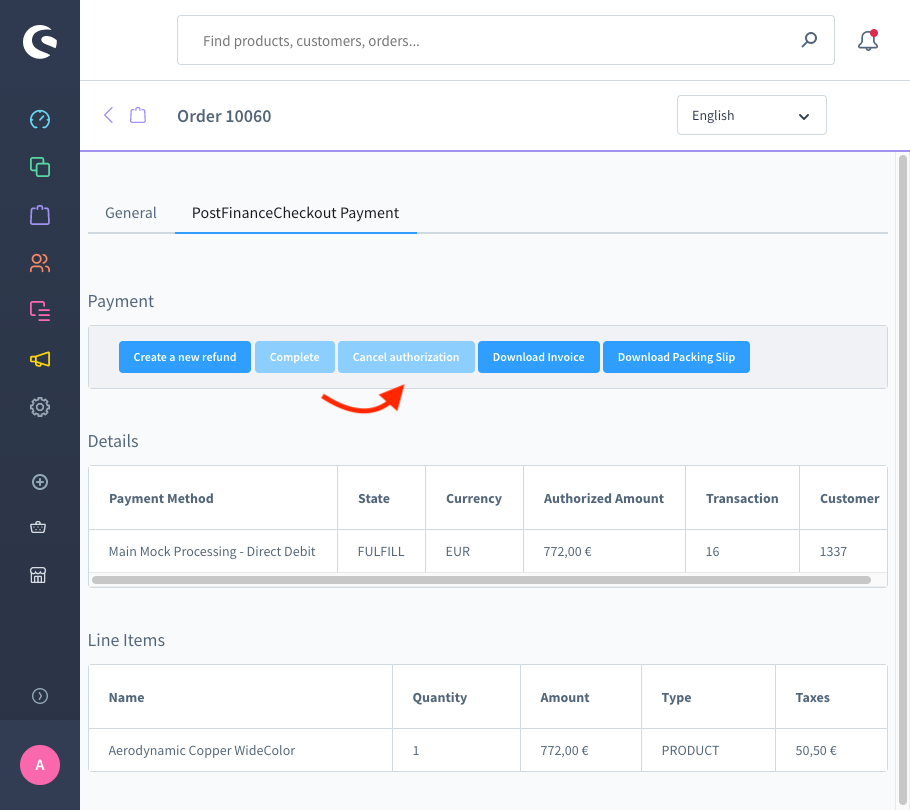
9.2Void a transaction
In order to void a transaction, open the order and click on the Cancel authorization button.
|
Note
|
You can only void transactions that are not yet completed. |
9.3Refund of a transaction
You have the possibility to refund already completed transactions. In order to do so, open the captured order. By clicking on the 3 dots (…) on a line-item, you can refund the line-item partially (if it has a higher quantity than 1), or you can refund the whole line-item. In case the payment method does not support refunds, you will not see the possibility to issue online refunds.
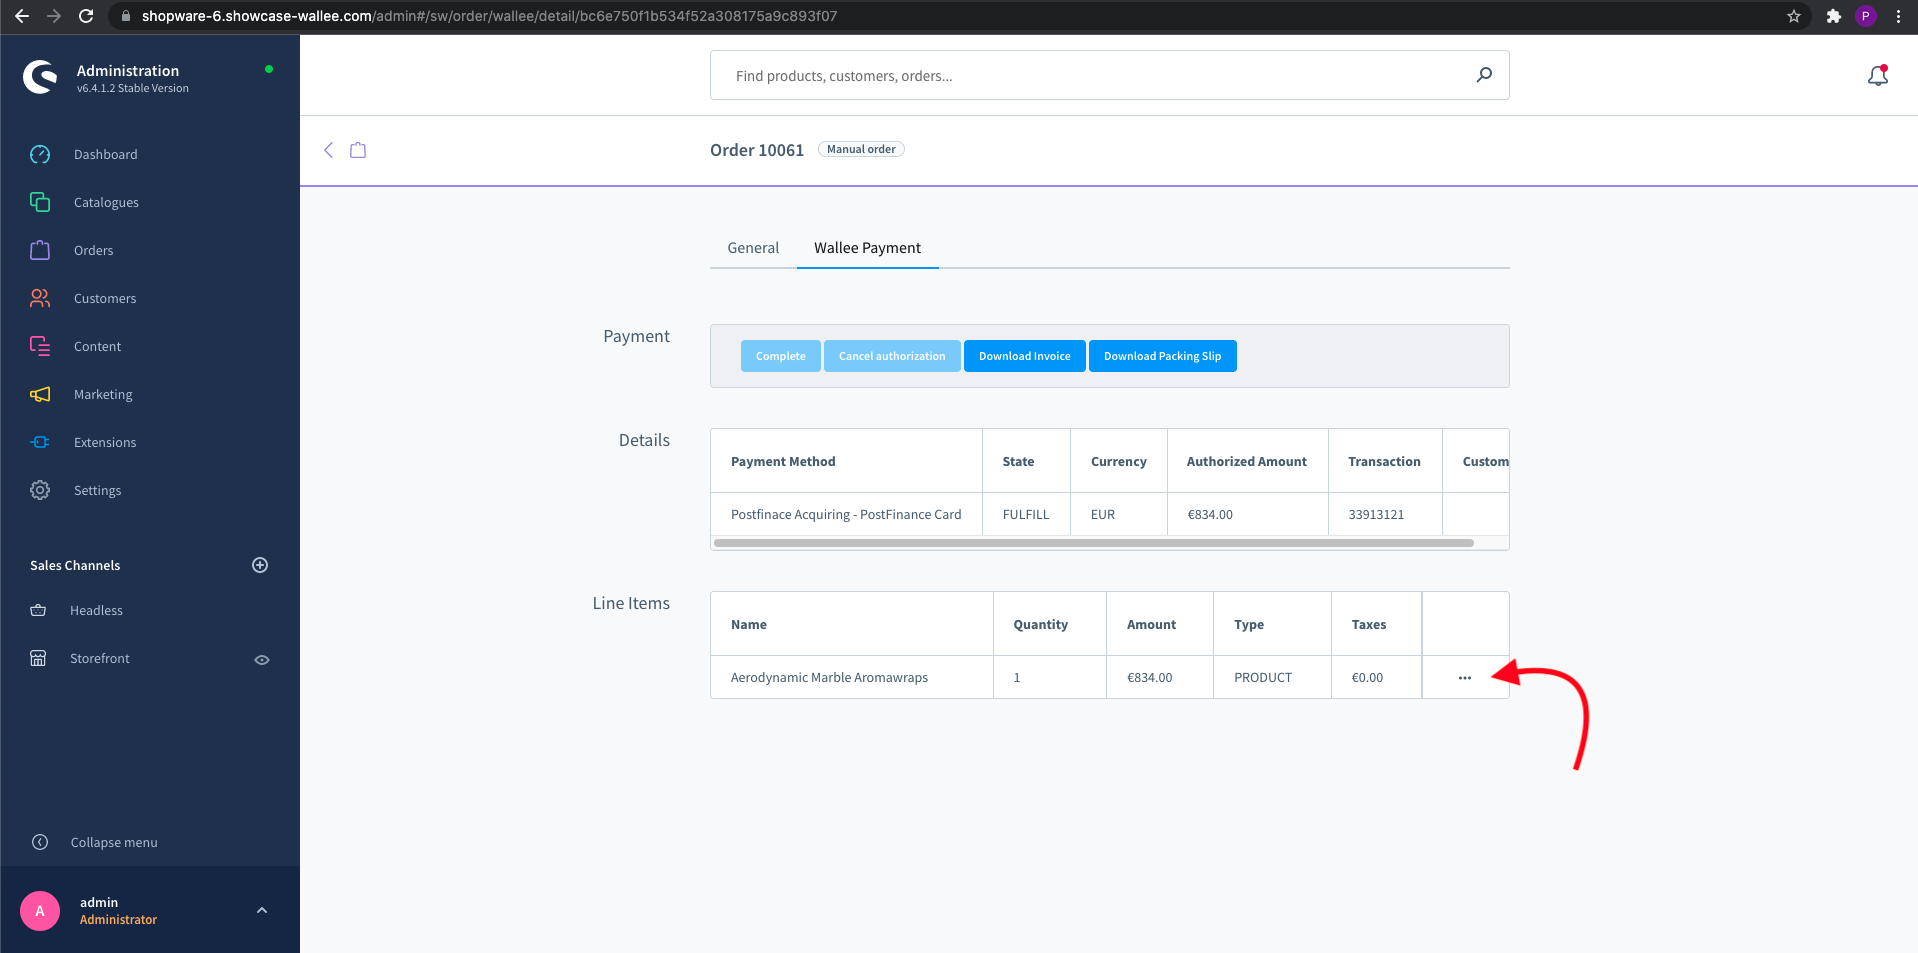
You can carry out as many individual refunds as you wish until you have reached the total amount of the original order. The status of the order then automatically switches to complete.
|
Note
|
It can take some time until you see the refund in Shopware. Refunds will only be visible once they have been processed successfully. |
9.4On hold orders
The delivery should not be done whilst the delivery state is Hold. This happens when the transaction in PostFinance Checkout
has not reached the fulfill state.
There are essentially two reasons why this can happen:
-
The transaction is not completed. In this case you have to complete the transaction as written above.
-
We are not able to tell if you should fulfill the order. The delivery decision is done automatically. If this does not happen within the defined time frame, PostFinance Checkout will generate a manual task which you should observe and follow the instructions.
You can find more information about manual tasks in our Manual Task Documentation.
9.5Limitations of the synchronization between PostFinance Checkout and Shopware
Please note that captures, voids and refunds done in PostFinance Checkout are synchronized. However, there are some limitations. Inside PostFinance Checkout you are able to change the unit price and the quantity at once. This can not be done in the Shopware backend. We therefore recommend that you perform the refunds always inside the Shopware backend and not inside PostFinance Checkout. If a refund cannot be synchronized it will be sent to the processor but it could be that you do not see it inside your Shopware backend.
You can find more information about Refunds in PostFinance Checkout in our Refund Documentation.
9.6Tokenization
In case the payment method supports tokenization you can store the payment details of your customer for future purchases.
In order to use this feature make sure that the One-Click-Payment Mode in your payment method configuration is set to allow or force storage.
|
Note
|
Tokenization is not available for guest checkouts. |
9.7Recurring payments
Shopware provides the package "Shopware Commercial" with additional features, among others, subscriptions. This plugin supports making payments that are suitable for subscriptions. As long as the payment method’s conector supports tokenization, it can be used for subscriptions. The recurring payment is fully managed by Shopware Commercial plugin. Please refer to their documentation for more information.
9.8Key Features
-
iFrame Integration: Embed payment forms directly into your checkout.
-
Refunds & Captures: Trigger full/partial refunds and captures from Shopware or the PostFinance Checkout Portal.
-
Multi-Store Support: Manage configurations across multiple stores.
-
Automatic Updates: Payment methods sync dynamically via the PostFinance Checkout API.
-
Recurring payments: Make recurring payments with Subscriptions (Shopware Commercial) and PostFinanceCheckout.
9.9Troubleshooting
-
Logs: Check payment logs with:
tail -f var/log/whitelabelname*.log -
Common Issues:
-
Ensure
composer update whitelabelname/shopware-6is run after updates. -
Verify API credentials match your PostFinance Checkout account.
-
9.10FAQs
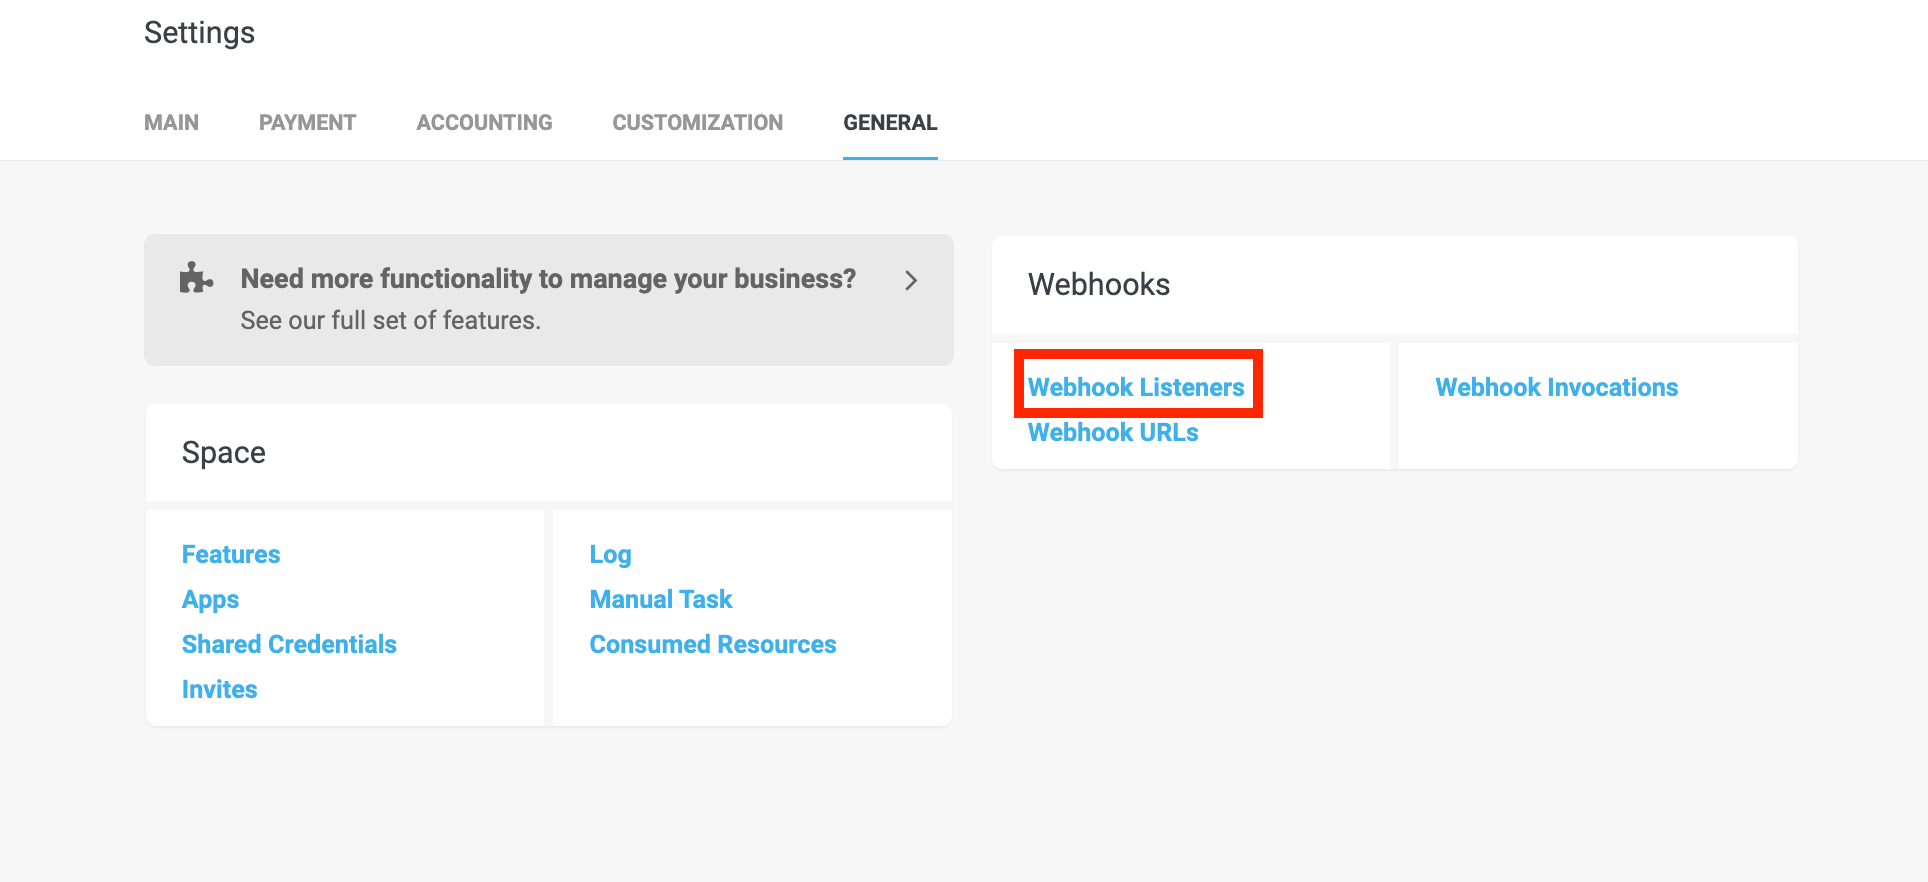
Q: How to be sure that the connection between the portal and the shop is working?
A: You will need to see if the webhooks were correctly created. To do so; please navigate to your space in the portal, go to Settings → General → Webhook Listeners

Q: Does this plugin support one-click payments?
A: Yes, via tokenization in the PostFinance Checkout Portal.
Q: How do I handle PCI compliance?
A: The plugin uses iFrame integration, reducing PCI requirements to SAQ-A.
Q: Does the plugin support Apple Pay?
A: Yes, the plugin support wallet like Apple Pay.
10Changelog
For version-specific updates, see the GitHub Releases.
11Contributing
Report issues via GitHub Issues.
Follow the Shopware Plugin Base Guide for development.
12Support
If you need help, feel free to contact our support.